 If you were able to grasp the concepts outlined in the first article about audio distortion, then this one will be a piece of cake. If not, head back and have another read. It can be a bit complicated the first time around.
Undistorted Audio Analysis
When looking at the specifications for an audio component like an amplifier or processor, you should see a specification called THD+N. THD+N stands for Total Harmonic Distortion plus Noise. Based on this description, it is reasonable to think that distortion changes of the shape of the waveform that is being passed through the device.
The two graphs below show a relatively pure 1kHz tone in the frequency and time domains:
 A Look At Harmonic Distortion
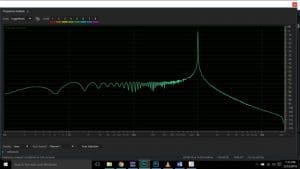 If we record a pure 1 kHz sine wave as an audio track and look at it from the frequency domain, we should see a single spike at the fundamental frequency of 1 kHz. What happens when a process distorts this signal? Does it become 1.2 or 1.4 kHz? No. Conventional distortions won’t eliminate or move the fundamental frequency. But, it will add additional frequencies. We may have a little bit of 2 kHz or 3 kHz, a tiny but of 5 kHz and a smidge of 7 kHz. The more harmonics there are, the more “harmonic distortion” there is.
You can see that there are some small changes to the waveform after being played back and recorded through some relatively low-quality equipment. Both low- and high-frequency oscillations are added to the fundamental 1 kHz tone.
Signal Clipping
 In our last article, we mentioned that the frequency content of a square wave included infinite odd-ordered harmonics. Why is it important to understand the frequency content of a square wave when we talk about audio? The answer lies in an understanding of signal clipping.
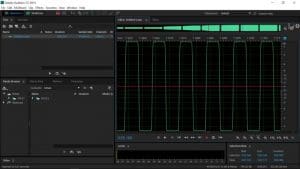
When we reach the AC voltage limit of our audio equipment, bad things happen. The waveform may attempt to increase, but we get a flat spot on the top and bottom of the waveform. If we think back to how a square wave is produced, it takes infinite harmonics of the fundamental frequency to combine to create the flat top and bottom of the square wave. This time-domain graph shows a signal with severe clipping.
When you clip an audio signal, you introduce square-wave-like behaviour to the audio signal. You are adding more and more high-frequency content to fill in the gaps above the fundamental frequency. Clipping can occur on a recording, inside a source unit, on the outputs of the source unit, on the inputs of a processor, inside a processor, on the outputs of a processor, on the inputs of an amplifier or on the outputs of an amplifier. The chances of getting settings wrong are real, which is one of the many reasons why we recommend having your audio system installed and tuned by a professional.
Frequency Content
Let’s start to analyze the frequency content of a clipped 1 kHz waveform. We will look at a gentle clip from the frequency and time domains, and a hard clip from the same perspective. For this example, we will provde the digital interface that we use for OEM audio system frequency response testing.
Here are the frequency and time domain graphs of our original 1 kHz audio signal once again. The single tone shows up as the expected single spike on the frequency graph, and the waveform is smooth in the time domain graph:
 Low Distortion Analysis
The graphs below show distortion in the audio signal due to clipping in the input stage of our digital interface. In the time domain, you can see some small flat spots at the top of the waveform. In the frequency domain, you can see the additional content at 2, 3, 4, 5, 6 kHz and beyond. This level of clipping or distortion would easily exceed the standard that the CEA-2006A specification allows for power amplifier measurement. You can hear the change in the 1 kHz tone when additional harmonics are added because of the clipping. The sound changes from a pure tone to one that is sour. It’s a great experiment to perform.
 High Distortion Analysis
The graphs below show the upper limit of how hard we can clip the input to our test device. You can see that 1 kHz sine wave then looks much more like a square wave. There is no smooth, rolling waveform, just a voltage that jumps from one extreme to the other at the same frequency as our fundamental signal – 1 kHz. From a frequency domain perspective, there are significant harmonics now present in the audio signal. It won’t sound very good and, depending on where this occurs in the audio signal, can lead to equipment damage. Keep an eye on that little spike at 2 kHz, 4 kHz and so on. We will explain those momentarily.
 Equipment Damage From Audio Distortion
Now, here is where all this physics and electrical theory start to pay off. If we are listening to music, we know that the audio signal is composed of a nearly infinite number of different frequencies. Different instruments have different harmonic frequency content and, of course, each can play many different notes, sometimes many at a time. When we analyze it, we see just how much is going on.
What happens when we start to clip our music signal? We get harmonics of all the audio signals that are distorted. Imagine that you are clipping 1.0 kHz, 1.1, 1.2, 1.3, 1.4 and 1.5 kHz sine waves, all at the same time, in different amounts. Each one adds harmonic content to the signal. We very quickly add a lot more high-frequency energy to the signal than was in the original recording.
If we think about our speakers, we typically divided their duties into two or three frequency ranges – bass, midrange and highs. For the sake of this example, let’s assume we are using a coaxial speaker with our high-pass crossover set at 100 Hz. The tweeters – the most fragile of our audio system speakers – are reproducing a given amount of audio content above 4 kHz, based on the value of the passive crossover network. The amount of power the tweeters get is proportional to the music and the power we are sending to the midrange speaker.
If we start to distort the audio signal at any point, we start to add harmonics, which means more work for the tweeters. Suddenly, we have this harsh, shrill, distorted sound and a lot more energy being sent to the tweeters. If we exceed their thermal power handling limits, they will fail. In fact, blown tweeters seem as though they are a fact of life in the mobile electronics industry. But they shouldn’t be.
More Distortion
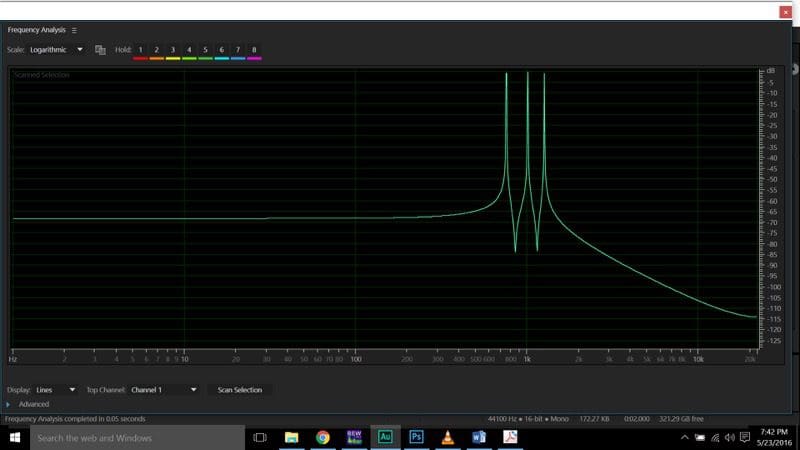
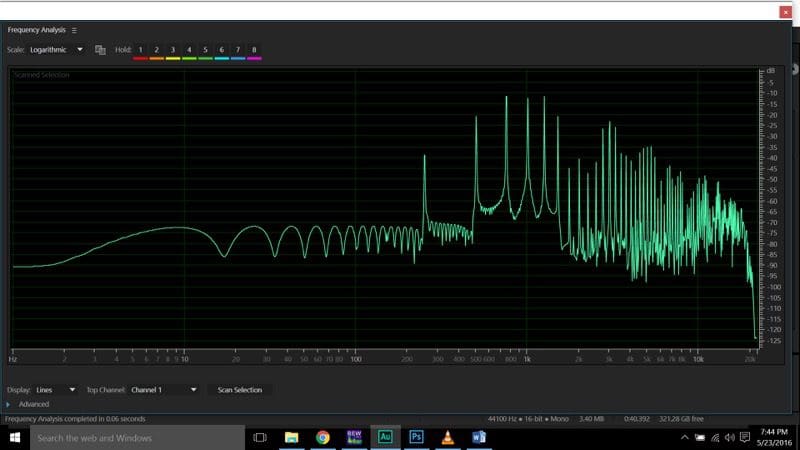
Below is frequency domain graph of three sine waves being played at the same time. The sine waves are at 750 Hz, 1000 Hz and 1250 Hz. This is the original playback file that we created for this test:
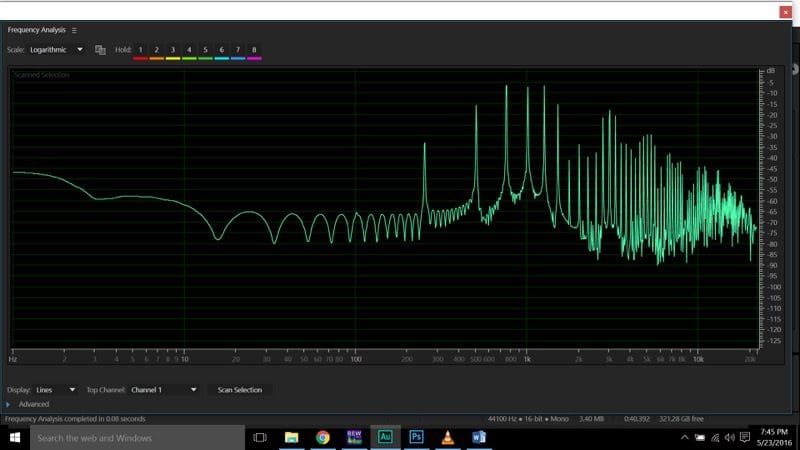
After we played the three sine wave track through our computer and recorded it again via our digital interface, here is what we saw. Let’s be clear: This signal was not clipping:
You can see that it’s quite a mess. What you are seeing is called intermodulation distortion. Two things are happening. We are getting harmonics of the original three frequencies. These are represented by the spikes at 1500, 2000 and 2500 Hz. We are also getting noise based on the difference between the frequencies. In this case, we see 250 Hz multiples – so 250 Hz, 500 Hz, 1500 Hz and so on. Ever wonder why some pieces of audio equipment sound better than others? Bingo!
As we increase the recording level, we start to clip the input circuitry to our digital interface and create even more high-frequency harmonics. You can see the results of that here:
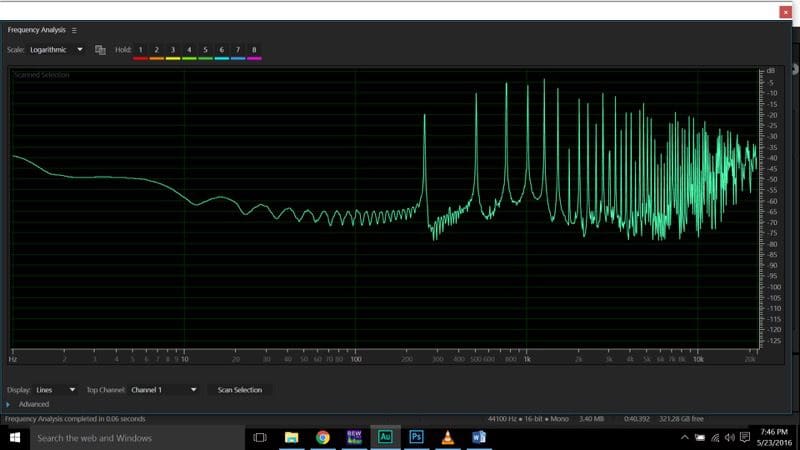
Now, to show what happens when you clip a complex audio signal, and why people keep blowing up tweeters, here is the same three-sine wave signal, clipped as hard as we can into our digital interface:
You can see extensive high-frequency content above 5 kHz. Don’t forget – we never had any information above 1250 Hz in the original recording. Imagine a modern compressed music track with nearly full-spectrum audio, played back with clipping. The high-frequency content would be crazy. It’s truly no wonder so many amazing little tweeters have given their lives due to improperly configured systems.
A Few Last Thoughts about Audio Distortion
There has been a myth that clipping an audio signal produces DC voltage, and that this DC voltage was heating up speaker voice coils and causing them to fail. Given what we have examined in the frequency domain graphs of this article, you can now see that it is quite far from a DC signal. In fact, it’s simply just a great deal of high-frequency audio content.
Intermodulation distortion is a sensitive subject. Very few manufacturers even test their equipment for high levels of intermodulation distortion. If a component like a speaker or an amplifier that you are using produces intermodulation distortion, there is no way to get rid of it. Your only choice is to replace it with a higher-quality, better-designed product. Every product has some amount of distortion. How much you can live with is up to you.
Distortion caused by clipping an audio signal is very easily avoided. Once your installer has completed the final tuning of your system, he or she can look at the signal between each component in your system on an oscilloscope with the system at its maximum playback level. Knowing what the upper limits are for voltage (be it into the following device in the audio chain or into a speaker regarding its maximum thermal power handling capabilities), your installer can adjust the system gain structure to eliminate the chances of clipping the signal or overheating the speaker. The result is a system that sounds great and will last for years and years, and won’t sacrifice tweeters to the car audio gods.
This was part 2 of a 2 the two part article: Everything You’ve Wanted To Know About Audio Distortion. Click HERE to read part 1.
This article is written and produced by the team at www.BestCarAudio.com. Reproduction or use of any kind is prohibited without the express written permission of 1sixty8 media.

Leave a Reply